Structuredò€
 Using the input mode structured you can fill areas digitized as an outer contour in the same way as if it would have been input in pairsF7IOVC.
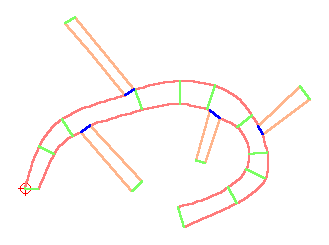
Contour cuts can be defined to separate branches ( displayed in blue in the illustration). You can input these cuts manually using the contour cuts – button  . There is also an automatic calculation algorithm of the cuts, it can be started with the button recalculate contour cuts
  . For more information please refer the respective chapter2PB6MUE
The stitch directions ( the green lines in the illustration) are input manually with the stitch directions button  , the automatic calculation is started with the button recalculate stitch directions
  . For more information please refer the respective chapter4AFL0DS
Existing stitch direction lines can be transformed into a spezial direction by clicking on the button  . In the moment the only special direction is the mitre corner. For more information please refer the respective chapter1MURZX0.
Startpoint of the automatic is the first digitized point, the endpoint is he same point, because the contour is always closed. Start- and endpoint can be moved to any point using the buttons 
 .If the endpoint is not set to a point on the contour or on a hole, the stitches to the nearest point on the edge of the area are calculated and one extra stitch to the endpoint is added.
Corners in the contour are produced by double clicking on the required position of the corner, or by pressing the corner-button  present in the parameter bar and the popup menu. This button also removes existing corners. Corners are displayed on the screen as crosses.
The contours form1O9U6M4 (curve or straight line) is defined using the form button  , more information is contained in the respective chapter.
The DistanceH8HP3U is defined using the Edit-Box  present in the parameter bar, for more information see the respective chapter.
Other parameter like overlap, Ramps, short stitches, etc, are defined in the parameter window after clicking the P-buttonHIDM_SONSTIGE_PARAMETER  .
.
Additional contours with exactly the same set of parameter (distance, stitch direction, stitch,type etc.) can be created by clicking to the additional contour button  .Please see also the respective chapterS_.E7Y.
A structured area can be switched into a outer contour automatic, a center line or a step stitch line using the buttons. This new automatic can either replace the existing one or can be added in front of or behind the area. Please use the respective buttons  and see the corresponding chapter698LWR. With this feature you can comfortably create a satin or step stitch border around and area.
Created with the Personal Edition of HelpNDoc: Revolutionize Your Documentation Review with HelpNDoc's Project Analyzer