Running
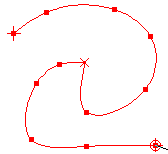
 The punching of running lines is exactly the same as the definition of outer contours.
The shape of the edge is specified by using the Curve/Line buttons 
 .
.
Corners are punched using a double click or by pressing the corner-button  .
.

When the closed curve  button is pressed then an even join is produced from the start and end points of the running line.
The step length of the stitches is defined in 1/10mm units in the upper toolbar, the various types of Fill and other Parameters are specified in the window displayed upon pressing the P-button  , see also the chapter Definition of stitch type11KE9PE.
Start-and endpoint of the Step stitch line are at the beginning and end of the digitized line at first, but can be moved to any other position. Additional runnings are calculated.
Branches can be input after having clicked the respective button  , these can be added at an existing line or can be totally separate. So it is possible to punch several lines of the same type in one single automatic, with only one start- and endpoint. The order of stitching is calculated automatically. Of course it is possible, that some lines have to be sewn more than once. Possible stitch effects line E-stitch or swing are made only in the last run.
Step stitch lines can be transformed into a center line, or - only if the curve is closed – into an outer contour. Please see also the respective chapter1N290WD
Created with the Personal Edition of HelpNDoc: Make Documentation a Breeze with a Help Authoring Tool