Pairwise
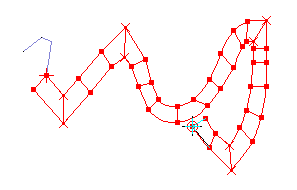
 With pairwise input a designs contours and stitch positions are input with the help of pairs of points. The distance of stitches and the calculation of shortened stitches can be edited for each pair. A segment is created from two sets of consecutive points. The last manually input stitch , or the last stitch of the previous automatic, is also the first stitch of the first pair of points.
The function Complex SatinKHMUFK  allows the input of branches inside a satin stitch automatic with automatic calculation of the best filling order.
The first pair of points define with their connecting line the direction of the first stitch in the segment, the connecting line of the next pair the direction of the last stitch in the segment.

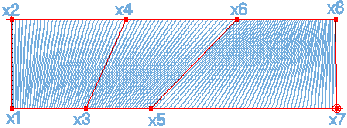
The first stitch to be calculated starts at the first point of the first pair to be defined. The last stitch calculated ends at the last point of the last pair of points to be defined.
The start- or endpoint of the automatic can be set to any other point by clicking to the startpoint-  or endpoint button
  and then clicking to the desired point.
The Stitches contained in an automatic are calculated when either the input mode is changed to manual mode12M6YHL or any other input mode, or the calculation button  is pressed which is present in the left hand tool bar and in the popup menu or the return-key is pressed on the keyboard.
Shortened stitches are automatically generated when a segments outside contour is much longer than it’s inside contour, for example for tight corners. The regularity with which shortened stitches are produced is defined in the parameter windowHIDM_SONSTIGE_PARAMETER .
Corners in the contour are defined by either double clicking on the required position, or by pressing the corner-button  present in the parameter line and in the popup menu. This button also allows you to remove corners. A corner is displayed as a cross and will be stitched in exactly during the automatic stitch calculation. If both points of a pair have been defined as to be corner, it will be stitched in at the side with includes the smaller angle.
The Type of edging1O9U6M4 (curve or straight line) used for the contour is defined using the form-button  , see also the respective chapter.
The DistanceH8HP3U is defined using the edit box  in the parameter line, see also the respective chapter.
Created with the Personal Edition of HelpNDoc: Streamline your documentation process with HelpNDoc's HTML5 template