Stitch direction
Inputting a stitch direction line is necessary whenever you digitized an area with outer contour or segmented input mode.
If you want to fill the area with satin stitches you first have to separate the shadow regions with contour cutsJUFQ.Z. The input of the stitch directions is done after that with a special feature3W_ESN.
If you want to fill the area with Stepp stitches or if the area has holes or shadow regions you have to use one of the following stitch direction functions.
To input a stitch direction you could press either the button for straight stitch direction  or the button for curved stitch direction
  in the popup menu.
The direction can then be defined as lying either totally inside, or totally or partially outside the area.
It is possible to define either one or several direction lines, so producing different embroidery effects.
One straight direction line - parallel step or satin stitch
If after pressing the direction button only two points are input, this stitch direction is used for the entire area. This stitch direction is then used when calculating the stitches together with the stitch type chosen.
Several straight lines -turned step or satin
If after inputing the first direction line the direction button is pressed again and additional lines are input, each made up of two points, then the stitch direction turns evenly between the first and the last direction defined. The resulting effect is similar to pairwise input.
You have to take care about punching the first and the last direction line completely outside the contour of the punched area. Every direction line in between these both must cut the area twice
A stitch direction line can be converted into a special direction by clicking the special direction button1MURZX0  . So you can define a mitre corner.
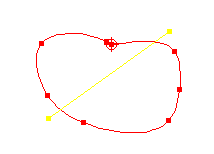
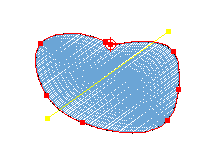
One curved line -curved step stitch
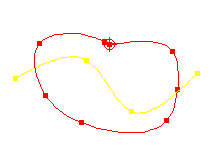
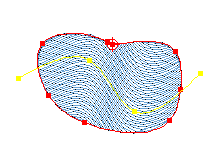
If a direction line is defined as a curve containing several points and if not undivided satin is chosen as stitch type, but any divided type, then the area is filled with curved stitch-“lines”, which have the same shape as the direction curve and run parallel next to one another.
The stitch direction curve has to cut the punches area in any case.
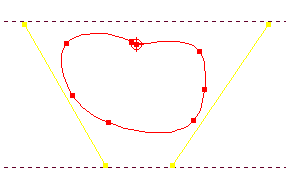
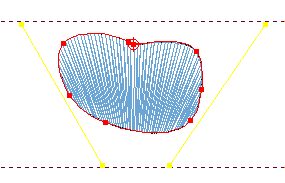
Several curved lines - curved step which changes from one line to the next.
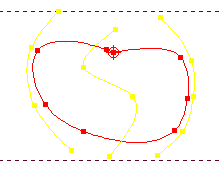
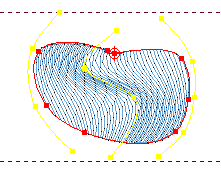
If several direction curves are defined, separated by repeatedly pressing the direction button. Then the stitch direction changes slowly between one curve and the next, that is to say the stitch “curves” change gradually from one form to the next and are therefore no longer parallel.
Here you have to follow the same input rules as for several straight direction lines.
In the parameter-windowP_PARAA1 you can define if the selected distance shall be kept in the middle of the area or if the average value over area is calculated
To return to normal punch mode you simply press the direction button
twice.
Please note that you have the possibility to define an own distance valueH8HP3U for every single stitch direction line
Created with the Personal Edition of HelpNDoc: Easily create CHM Help documents