Move end point
You are free to define anywhere the start- or endpoint of the filling for all input modes.
Start- and endpoint is marked by a circle resp. a cross. They become clearer, if you switch on the Display start-endmarker entry in the Display menu. Then small markers are displayed which point at the start- and endpoint.
After digitizing an area, the end point is initially also the starting point. Two methods can be used to move the points:
Either the startpoint  or end point button
  in the popup menu is pressed and then the new position for the point is clicked on, the point is then moved to this new position.
Alternatively overwrite mode is chosen, this means that the insert button  should not displayed as pressed, the respective point is then clicked on using the mouse and dragged to it’s new position, keeping the mouse button pressed. When the correct position is reached the point is fixed by letting go of the mouse button.
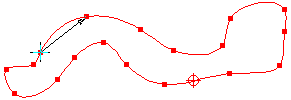
The start- or end point can lie on the edge of the contour, even of a hole, inside or totally outside the area. The stitches are however always calculated to the nearest point on the outer contour or on the hole and then a connecting stitch is inserted to the actual point.
Created with the Personal Edition of HelpNDoc: Make CHM Help File Creation a Breeze with HelpNDoc